Configure Single Sign-On (SSO)
hila supports Single Sign-On (SSO). hila provides basic configurations for Azure, Okta, Auth0, and Google.
Configure an SSO provider
-
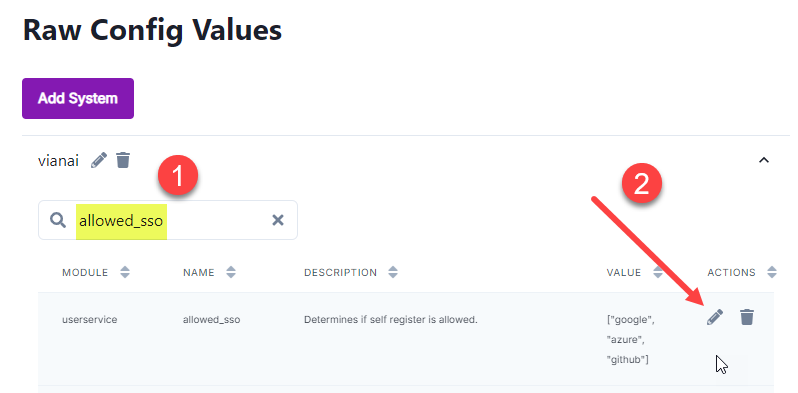
In the hila monitoring app (https://monitoring.your-stack-domain), click Settings in the bottom-left corner and then select Raw Config Values.
-
Expand the vianai row.
-
Search for the following config values to edit them as needed:
-
Search for:
allowed_ssoand open the editor.-
Hover over the row that appears and click the edit icon.
-
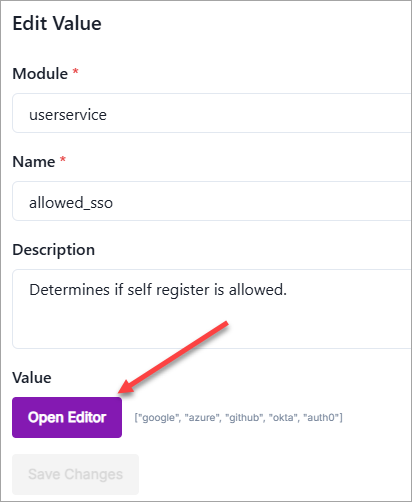
In the Edit Value pane, click Open Editor.
-
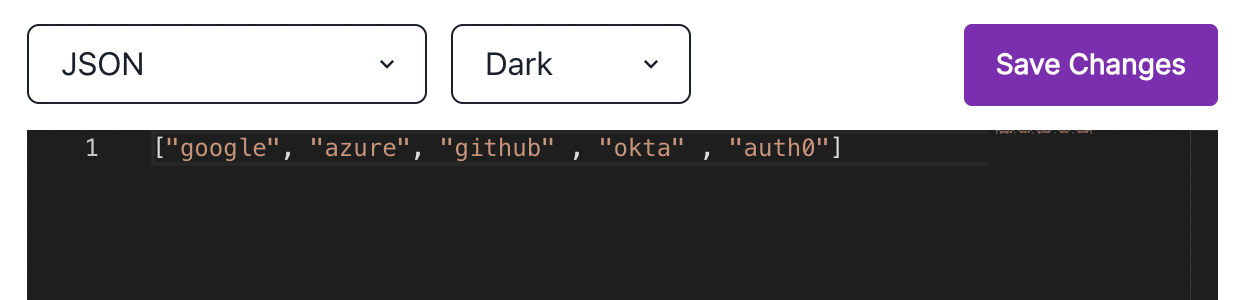
In the editor, add your provider to the list and click Save Changes.
-
In the Edit value pane, click Save Changes.
-
-
Search for:
sso_configsand open the editor.The configuration for each provider is in a separate block, based on the configuration the provider requires.
-
Edit the block for your provider as needed or add a new block if your provider is not in the list.

-
Click Save Changes.
-
-
Search for:
sso_providersand open the editor.-
Enter the sign-in page information for your provider, such as the text, client_id, tenant_id, and domain that your provider requires, and click Save Changes.

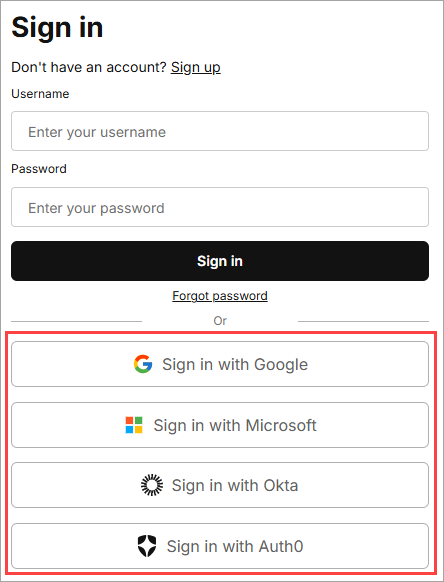
Each provider is listed on the hila sign-in page with the provider’s name and logo and is configured to connect to the provider for the user’s authentication.
-
-
Search for:
sso_role_mappingand open the editor.The role maps the groups and preferences you have defined on your SSO provider to roles and preferences in hila.

When the user signs in, the provider sends hila an object with the user’s group and preference information.
-
You must configure the mapping for the following items so hila can assign the correct role and preferences to the user:
group2role_location— A list of JPaths to the location of the group in the object sent by the provider.group2role— Maps the groups in the object to roles in hila. To create a role in hila, see Users, roles, and permissions.-
preferences— A list of hila preference objects where you can define default preferences you want to set for the user.The preferences appear in the monitoring app under User (bottom of left pane) > Manage Profile > User Preferences. The preferences content is an object with the fields matching the columns under User Preferences: module, name, description, and value.
Note: A key preference to set for the user is company code to define what data the user can access. That object looks like this:
{
  "module": "db_session_context",
  "name": "company_code",
  "description": "Company Code",
  "value": "users_company_code"
}
You can also set any of the preferences on the Profile page by setting the module to profile.
preference_location— A list of JPaths to the location of the preferences in the object sent by the provider.
-
Click Save Changes.
-
- Search for:
self_register_allow— Set toTrueto allow users to self-register. - Search for:
self_register_allow_qnaui— Set toTrueto allow users to self-register on the UI app. - Search for:
self_register_allow_monitoring— Set toTrueto allow users to self-register on the monitoring app.
-
Provider-side configuration
For your convenience, here are instructions for configuring the provider-side info for Okta and Azure.
- Okta — For instructions on configuring hila SSO in your Okta dashboard see Configure SSO Okta dashboard.
- Azure — For instructions on configuring hila SSO in your Azure dashboard see Configure SSO Azure dashboard.