hila Conversational Analysis quick setup
This topic shows how to set up hila Conversational Analysis (hCA), starting with a new VM and ending by getting an answer to a query against your financial data.
Each section shows the simplest way to accomplish that task, but more detailed instructions for alternate methods are available in the links to other topics.
1. Create a VM
Create a VM on your cloud provider with the following minimum specifications:
CPUs 16 RAM 64 GB Disk 500 GB OS Ubuntu 24.04 LTS Networking • HTTPS (for end user access)
• SSH enabled (or similar method so you can upload the script to the VM)Hostname • The hostname should not contain uppercase letters.
• If you use uppercase letters, you will need to setcluster_name=${HOSTNAME,,}later in this procedure.
- Note the IP address for use in the installation process.
- For convenience and consistency, create the VM with the username
ubuntu. If you use a different username, replaceubuntuwith your username in the following steps. - To create an ssh key to access the VM:
- In a terminal on your local machine, run
ssh-keygento create a new key pair. - Press enter to accept the default location for the key pair, or enter a filename.
- Press enter to accept the default passphrase, or enter a passphrase.
- Press enter to confirm the passphrase.
- The public key is saved in the
~/.sshdirectory with the default name or the name you provided. - Open the public key file and copy the contents to the ssh public key field when you create the VM.
- In a terminal on your local machine, run
For full documentation for creating a VM and installing hila, see Install hila.
2. Install third-party tools and whitelist URLs
See Third-party tools and whitelist URLs for details.
3. Install hila
-
From a terminal on your local machine,
sshinto the VM, making sure to editYOUR_PRIVATE_KEY_FILEto point to your private key file andIP_ADDRESSto match your VM’s IP address:ssh -i "~/.ssh/<YOUR_PRIVATE_KEY_FILE>.key" -o StrictHostKeyChecking=no ubuntu@<IP_ADDRESS> -t bash -
Set the following environment variables:
export api_key=<YOUR API KEY> export version=HILA_VERSION_TO_INSTALL # (Current release is 5.0.0-r.2) export domain=YOUR_DNS_DOMAIN # (excluding cluster name) export datadir=/home/ubuntu/data # (if not set, defaults to /swapfile) export cloud_provider=CLOUD_PROVIDER # (aws, azure, gcp, or oci) export admin_email=YOUR_EMAILNote: The email is important because it is used to send a one-time login email to the admin user. The admin then sets up a password as then has access to hila. -
Pull the latest install scripts from Vianai’s repository:
wget --header "x-api-key:$api_key" -q -O - 'https://webservices.launchpad.vianai.site/v1/stacks-installers' | tar -xzv -
Run pre-check
-
Run the pre-check script to gather the VM details necessary to verify it is suitable to install Conversational Analysis. This command also registers a DNS entry and generates a certificate.
sudo ./cluster-creation-scripts/k3s_vm_precheck.sh api_key=$api_key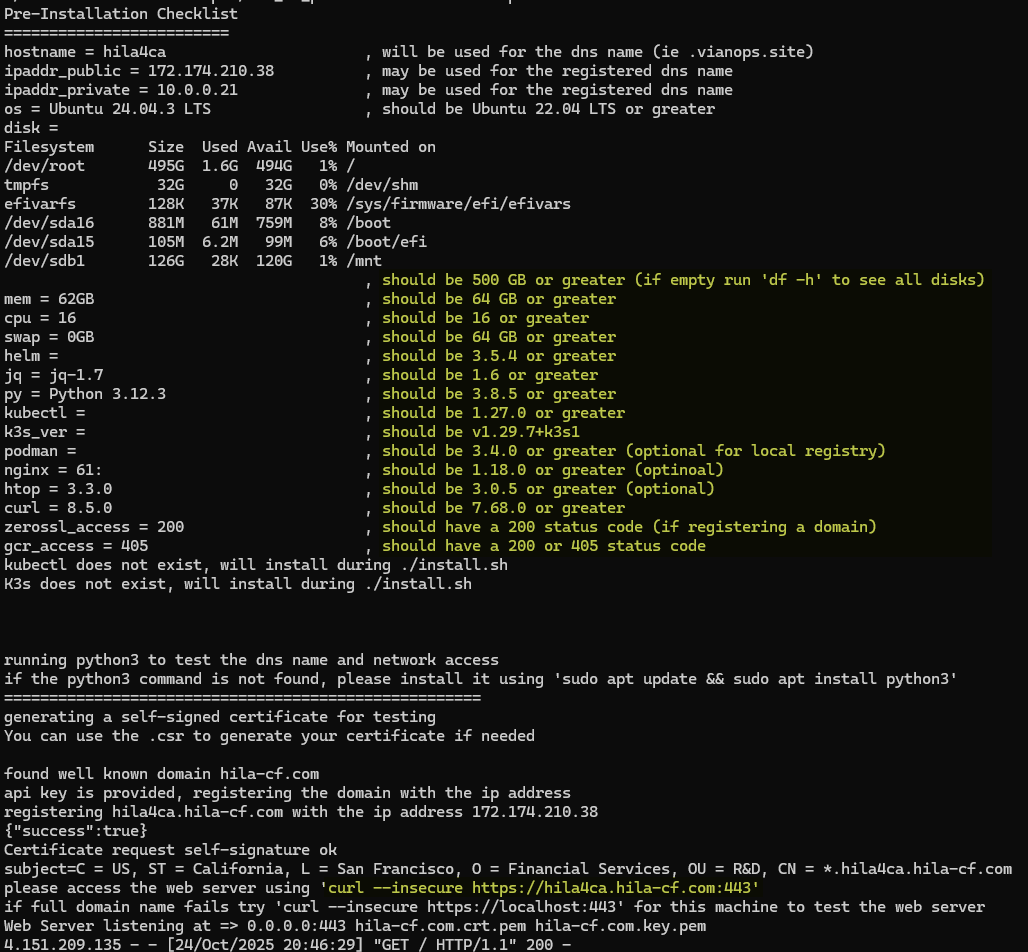
- The recommended values are in the column on the right.
- If you don’t run with
sudo, you will get apermissions deniederror.
-
In another shell, run the
curlcommand at the bottom of the pre-check output to verify the DNS and certificate were created successfully. You must run it in another shell because the current shell is busy running the pre-check script. -
Type
Ctrl-Cto exit the pre-check script when you see thecurlcommand output shows the DNS and certificate are correct.
-
-
Install hila
-
Install hila by running the following command:
./cluster-creation-scripts/k3s-microstack.sh vm_setup_only=run cloud_provider=$cloud_provider custom_cert=no custom_repo=no cluster_name=$HOSTNAME admin_email=$admin_email datadir=$datadir dns_domain=$domain api_key=$api_key image_branch=$version-
If you are prompted for the ssh public key value, enter it. If you are prompted for any other values, accept the defaults by pressing Enter.
-
After this command finishes, it can take up to 30 minutes for you to get the one-time login email.
-
To monitor the progress of the pod install, open a new terminal window to the VM and enter the following command:
watch -n 2 kubectl get pods -
You can also monitor when the certificate goes true in another terminal window with this command:
watch -n 2 kubectl get certificates -A
-
-
When the install is complete, you will receive an email with a one-time login link.
-
Click the link in the email to set up your password.
-
After entering a new password, click Back to sign in page.
-
Log in with your username and password. Your username is the part of your email address before the “@” symbol.
-
4. Verify vianctl install and extract example scripts
The hila cli, vianctl, gets installed along with hila, but you can install vianctl on any machine and point it to the stack of your choice. To install vianctl, see Vianai Command Line Interface (vianctl).
Verify vianctl is installed by adding a stack, authorizing, and extracting the examples.
-
Add stack name to vianctl config, giving a stack name and your stack’s DNS domain:
vianctl config add-stack <STACK_NAME> https://webservices.<YOUR_CLUSTER>.<YOUR_DNS_DOMAIN>For example:
vianctl config add-stack hila https://webservices.valuecorp.vianai.site -
Authorize vianctl, giving your credentials when prompted:
vianctl auth login -
Extract examples, giving a DIR_NAME where to save the files, such as
examples.vianctl examples extract --target-dir <DIR_NAME>For example:
vianctl examples extract --target-dir examples
5. Configure LLMs
The quick way to configure LLMs is by running the metadata-endpoint-key.sh script in the examples directory you extracted in the previous step. Be sure to add your model URL, API token, and LLM type.
The script uses vianctl commands, so before you run it, you need to authorize vianctl on your stack with your credentials:
vianctl auth login
Then run the script as follows, replacing the placeholders with your actual values:
metadata-endpoint-key.sh endpoint=<URL_TO_MODEL> api_key=<YOUR_API_TOKEN_FOR_MODEL> type=<gpt|azure> model_name_ext=<MODEL_NAME_EXTENSION>
For example:
metadata-endpoint-key.sh endpoint="https://api.openai.com/v1/chat/completions" api_key="sk-xxxxxxxxxxxxxxxxxxxxxxxxxxxxxxxx" type="gpt" model_name_ext="gpt-5-chat"
metadata-endpoint-key.sh endpoint="https://api.opanai.com/v1/chat/completions" api_key="sk-xxxxxxxxxxxxxxxxxxxxxxxxxxxxxxxx" type="azure" model_name_ext=azure-gpt-5-chat"
For this release, the supported LLMs are:
- OpenAI gpt-5-chat: type=
openai-gpt5-chat - OpenAI gpt-4o: type=
openai-gpt4o - Azure OpenAI gpt-5-chat: type=
azure-openai-gpt5-chat - Azure OpenAI gpt-4o: type=
azure-openai-gpt4o
The supported embedding models are:
- OpenAI text-embedding-3-large: type=
openai-embedding-3-large - Azure OpenAI text-embedding-3-large: type=
azure-openai-embedding-3-large
For more details on configuring LLMs, see Configure LLMs.
6. Create a data connection
The quick way to configure a data connection is to run the following vianctl command, giving your connection parameters. Be sure to replace the placeholders with your actual values.
vianctl externalconnections create --name <NAME_OF_CONNECTION> --description "<DESCRIPTION_OF_CONNECTION>" --type <DB_TYPE> --url "<YOUR_URL>"
Examples for popular databases:
vianctl externalconnections create --name my_snowflake_connection --description "Snowflake connection" --type snowflake --url "snowflake:<CREDENTIAL_STRING>"
vianctl externalconnections create --name my_bigquery_connection --description "BigQuery connection" --type bigquery --url "bigquery:<CREDENTIAL_STRING>"
vianctl externalconnections create --name my_oracle_connection --description "Oracle connection" --type oracle --url "oracle:<CREDENTIAL_STRING>"
vianctl externalconnections create --name my_azuresql_connection --description "Azure SQL connection" --type azuresql --url "mssql+pyodbc:<CREDENTIAL_STRING>"
vianctl externalconnections create --name my_databricks_connection --description "Databricks connection" --type databricks --url "databricks:<CREDENTIAL_STRING>"
You can create external connections with user credentials as parameters in the URLs. See Parameterized data connections. Or you can set user permissions on the data connection object. See Set user permissions for objects.
For more details on creating a data connection, see Create a data connection.
7. Configure data structure
hila requires a number of configuration files to define your data schema. To set up those files, see Configure your data structure.
8. Create metadata
-
In the vianctl examples directory, navigate to
structured/std_metadata. -
Read the README.md file for instructions on how to set up the configuration files that define your metadata.
-
Copy the configuration files you created in the previous step to the
std_metadata/configsdirectory. -
Run the following command to create the metadata.
std_metadata.sh \ CONFIG_DIR=<PATH_TO_CONFIG_DIR> \ METADATA_FILE=configs/metadata.json \ HCA_VERSION=<CURRENT_RELEASE> \ # Current release is 5.0.0-r.2 VIEWS_FILE=configs/views.jsonCONFIG_DIR— The path to the directory where your configuration files are located. In this example, it would be in thestd_metadata/configsdirectory where you copied your config files in the previous step.METADATA_FILE— The name of the file that defines the metadata. In this example, it isconfigs/metadata.json.HCA_VERSION— The version number of hCA you are using. The current version is 5.0.0-r.2.VIEWS_FILE— The name of the file that defines the views. In this example, it isconfigs/views.json.
For example:
std_metadata.sh \ CONFIG_DIR=./std_metadata/configs \ METADATA_FILE=configs/metadata.json \ HCA_VERSION=5.0.0-r.2 \ VIEWS_FILE=configs/views.json -
After this script finishes, a data source appears in the hila UI under Data sources.
9. Create users and set permissions
Create users and set their permissions so they can access hila and the various data sources available to them.
One permission you must set for each user is the user preference that defines which country code the user is approved to access.
vianctl userpreferences set --user_id <USERNAME> --system vianai --module db_session_context --name company_code --value <COUNTRY_CODE_VALUE> --description "Set company code"
For example, to set the country code to USA for user jdoe:
vianctl userpreferences set --user_id jdoe --system vianai --module db_session_context --name company_code --value USA --description "Set company code to USA"
To create users, see Users, roles, and permissions.
To set permissions, see Set permissions.
Note: To set up generic database views for row-level access control (RBAC) for users and roles, see Row-Level Access Control.
10. Test the metadata
-
In the hila UI, select the data source you created in the previous step.
-
In a conversation window, sample questions should appear when you click in the query box.
-
Ask several questions to make sure the system is working.
Other tasks
- Upgrade hila
- Monitor hila system health