Install hila
hila is an infrastructure-agnostic platform that can be deployed on any cloud infrastructure, whether it is public or private, such as AWS, Azure, GCP, OCI, or on-premises. As long as the infrastructure supports Kubernetes, hila can be deployed on it.
These instructions describe how to deploy hila on a single-node Kubernetes cluster (k3s microstack) or a multi-node Kubernetes cluster (Full install).
Minimum requirements
To deploy hila in your environment, the following resources must be installed.
| Name | Version |
|---|---|
| Kubernetes | 1.27+ |
| Helm | 3.7 / 3.8 / 3.9 |
| kubectl | 1.27+ |
| curl | latest |
| Kustomize | 4.5 |
| Python (Optional) | 3.11 |
Deploying
Deploying hila involves the following main steps:
- Create a cluster on your provider
- Install the tarball you receive from Vianai
- Clone images to your private registry
Create a cluster on your provider
These instructions describe how to create a cloud cluster on the following cloud providers for you to run hila.
OnPrem
Follow these steps to install the platform in a local Kubernetes cluster.
Prerequisites
-
The following list shows what must already be configured before starting with the platform configuration.
-
It is necessary to previously configure a shared storage that is supported by Kubernetes, for example, configuring it through Glusterfs, CephFS, among others. To verify the configuration, the following link can be used as a reference. Storage Classes
-
The following node characteristics are recommended for small clusters.
Node Total nodes CPU RAM Disk Required Default node 3 4 16 GB 200 GB Yes Job Pool 0 - 3 4 16 GB 200 GB Yes -
In the values-files folder, there is the main-nfs-pvc.yaml file, it must be updated to the required space, at least 500 GB.
-
The nodes must have taints and labels configured as follows:
Configuration Key Value Node Label job pool-1 Job Pool Configuration Effect Key Value Node Taint NoSchedule job pool-1 Job Pool - You must have an A record
and a CNAME record <*.dns.record.site>, this should redirect to record A. - Install a software load balancer that provides an ingress to access those services. That entry needs an IP range or subnet. It also requires strictArp network. In this guide we will use MetalLB for this purpose.
-
To access the platform, you need a DNS record point to the address given to MetalLB load balancer.
- The platform can only be accessed securely through https protocol. You’ll need to create a certificate (public/private TLS key). Wildcard Certificate is recommended
-
Previous configurations
Install MetalLB
-
Enable strict ARP mode.
kubectl edit configmap -n kube-system kube-proxyand set:
apiVersion: kubeproxy.config.k8s.io/v1alpha1 kind: KubeProxyConfiguration mode: "ipvs" ipvs: strictARP: true -
Install MetalLB by manifest
kubectl apply -f https://raw.githubusercontent.com/metallb/metallb/v0.13.4/config/manifests/metallb-native.yaml -
Configure the MetalLB to use the IP address that you already have on the server following this guide.
Platform installation
-
You must enter in the Kubernetes context that you want to install the platform.
kubectl config current-context -
Go to the k8s folder and locate the values-files/customer-stack-values-withoutGPU.yaml file and necessarily change the hostname to the previously created record. If you want to use GPU on your configuration use the file called customer-stack-values-with-GPU.yaml.
hostname: <dns.record.site> -
In the same file, it is highly recommended to change the administrator password.
vianaiRootUserPassword: database_user: postgres database_pass: Change4Security root_user: vianai root_pass: Change4Security -
If you change the password, you must also change the password hash used by Elasticsearch.
es:
  hash_password:
$2a$12$Agrv6M2Jfg5G1mj4jZNsVOxFwnrLUyfZAgwRaEsBRBCcoHlp0u5hC
#Change4Security
To create a new hash you can use this options:
-
You can use the script that it’s located on the k8s folder called hash_password.py and run it like this.
python hash_password.py NewPassword -
Visit the follow link to create a new for your password. https://bcrypt-generator.com
-
-
If you have changed the administrator password, you must do the same in the values-files/postgresql-chart-values.yaml file, otherwise, you can skip this step.
postgresqlPassword: Change4Security postgresqlPostgresPassword: Change4Security -
Locate the file install-stack-on-k8s.sh and execute the following command with the following parameters.If you want to use GPU on your configuration use the file called customer-stack-values-withGPU.yaml.
./install-stack-on-k8s.sh <Your-DNS> values-files/customer-stack-valueswithoutGPU.yaml my-context -
Minutes after the script is executed, you will notice a message that tells you that you must update your DNS, the IP that you must place is the ingress IP that was configured on the load balancer.
-
Once the record has updated and also responds to the ingress IP, press enter to continue with the installation.
-
The platform can take a couple of minutes to be up and running, to monitor the progress it is recommended to execute the following command.
$ watch -n2 kubectl get pods --all-namespaces -
Once all the pods are in the running state, you can verify the platform by accessing the established route.
"https://ui.$domain_name/"
AWS
Create a cloud cluster on the AWS platform.
Requirements
- You must have received from your Vianai contact the script called
aws-cluster.sh.
Steps
-
At the top of the aws-cluster.sh script, edit the following values. An example is given in the following image.
CLUSTER_NAME Enter your cluster name. ZONE Enter your zone. 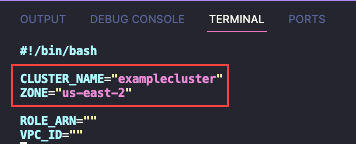
-
Run the
aws-cluster.shscript. The terminal shows the logs as it creates the resources. The entire process takes up to 20 minutes, and the script ends automatically when the all the resources have been created.
Azure
Create a cloud cluster on the Azure platform.
Requirements
- You must have received from your Vianai contact the script called
azure-cluster.sh.
Steps
-
At the top of the azure-cluster.sh script, edit the following values. An example is given in the following image.
TYPE internal PREFIX Cluster name LOCATION Cloud provider region PASSWORD Password of the bastion host (only required on internal clusters) 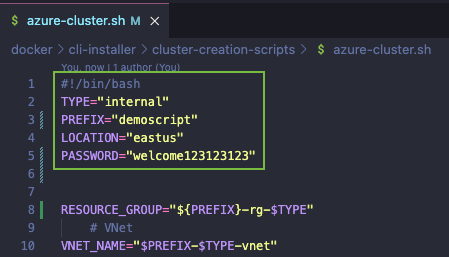
-
Scroll to the bottom of the script and set your node pool details in the lines that begin with “create_pool”. An example of the format appears in the following image.

-
Authenticate to Azure with the
AZ logincommand and follow the prompts as directed.
-
Run the
azure-cluster.shscript. As the script runs, it confirms the creation of each resource, as shown in the following example.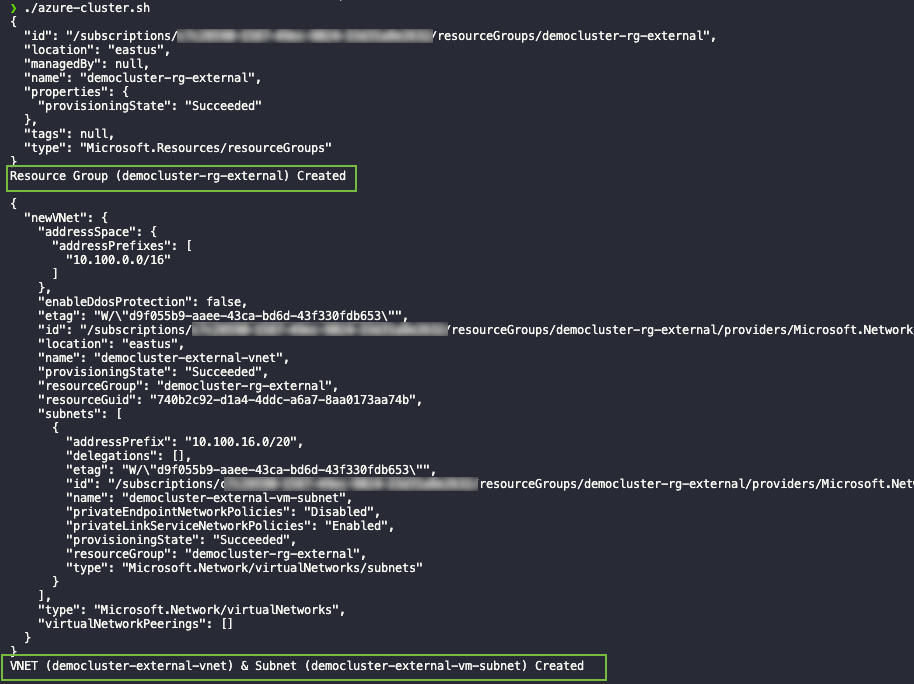
-
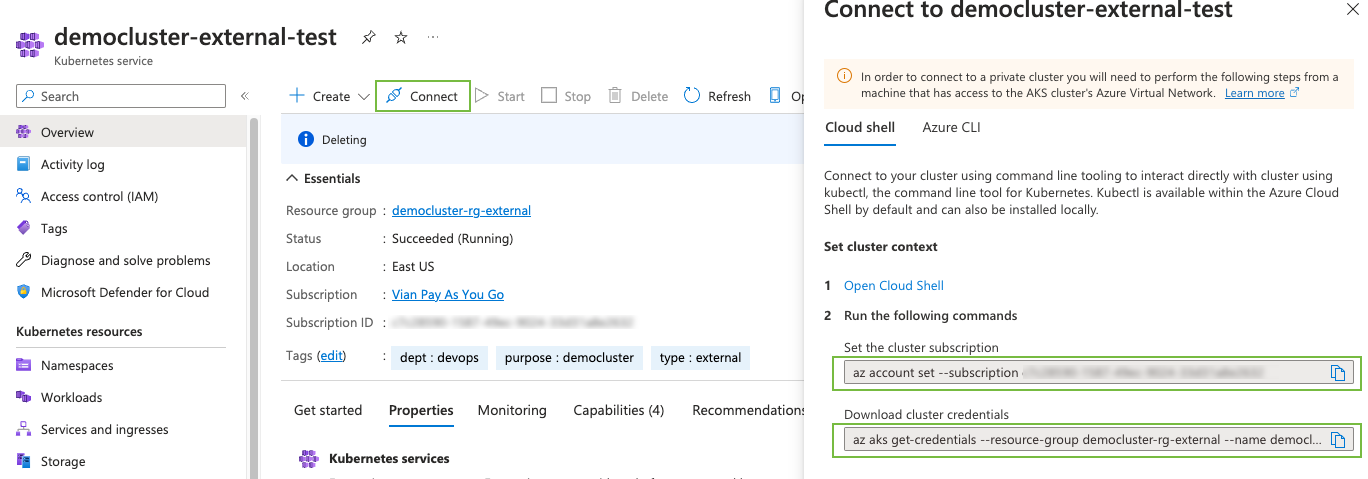
When the script finishes, navigate to the Azure console, select your cluster, then click “Connect”. Two commands appear for you to enter: the first sets your subscription, and the second gets your cluster credentials. You will use these two scripts to configure the environment in which the installer runs.
GCP
Create a cloud cluster on the GCP platform.
Requirements
- You must have received from your Vianai contact the script called
gcp-public-cluster.sh.
Steps
-
At the top of the
gcp-public-cluster.shscript, edit the following values. An example is given in the following image.PROJECT_ID Enter your project ID. CLUSTER_NAME Enter your cluster name. ZONE Enter the region of your cluster. 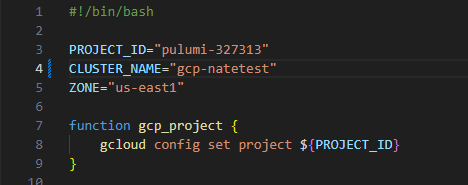
-
Authenticate to Google Cloud using the
gcloud auth login <email>command and follow prompts as directed. -
Run the
gcp-public-cluster.shscript. As the script runs, it confirms the creation of each resource. -
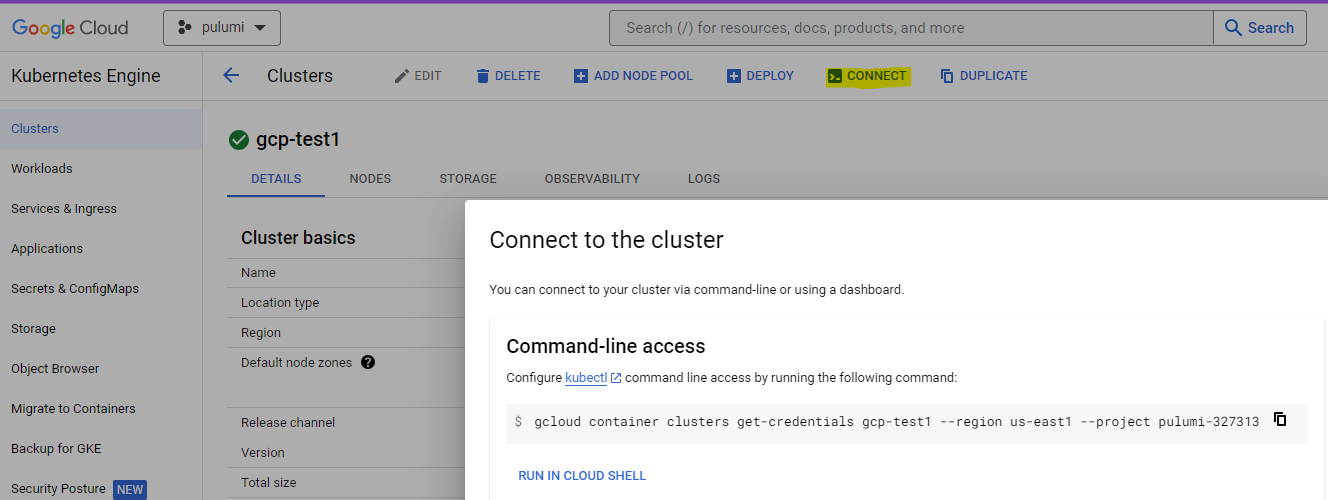
When the script has completed, navigate to the Google Cloud console, select your cluster, then click “Connect”. Copy and run the given command (see example in the following image) to configure the environment where the installer will run.
OCI
Create a cloud cluster on the OCI platform.
Requirements
- You must have received from your Vianai contact the script called
oci-cluster.sh.
Steps
-
At the top of the
oci-cluster.shscript, edit the following values. An example is given in the following image.COMPARTMENT_ID Enter your project ID. CLUSTER_NAME Enter your cluster name. 
-
Scroll to the bottom of the script and set your node pool details in the lines that begin with “create_pool”. An example of the format appears in the following image.

-
Run the
oci-cluster.shscript. As the script runs, it confirms the creation of each resource. -
Authenticate to OCI using the
oci-setup configcommand and follow the prompts as directed.
Install the tarball you receive from Vianai
This section describes how to install the hila tarball on your local system.
Requirements
- Get the tarball from your Vianai sales contact.
- You need access to the Kubernetes control plane.
- You need a Linux host with a bash shell.
- Your Linux host needs kubectl and helm applications installed.
Steps
-
Set the current kubectl context with your cloud provider.
-
Unzip and install the tar file as follows:
-
Navigate to the
/platform/directory. -
Run
tar zxvf vianai-platform-<#.#.#>.tar.gz, which unzips the tar file. -
Navigate to the
vianai-platformfolder and typels -ltrto ensure all files unzipped correctly. There should be three items:charts,install.sh, andkustomize. -
Run the install script with the following series of commands:
tar xzvf vianai-platform-<#.#.#>.tar.gz
cd vianai-platform
./install.sh
The platform is now installed on the cluster.
-
-
Connect to the new platform as follows:
-
Run
kubectl get gateway -o yamlto view the platform URL. For example,monitoring.azure-base.vianai.site -
Run
kubectl get svc -n istio-systemto print out the Load Balancer external IP. -
Create a new DNS “A” record in your cloud provider. For example, for Azure:
azure-base.vianai.site- Copy the load Balancer IP and add to Routing
-
Create a new CNAME record using the DNS name above.
-
Allow for about 10 minutes for the DNS records to propagate and then connect to the Monitoring URL from the first step in this process.
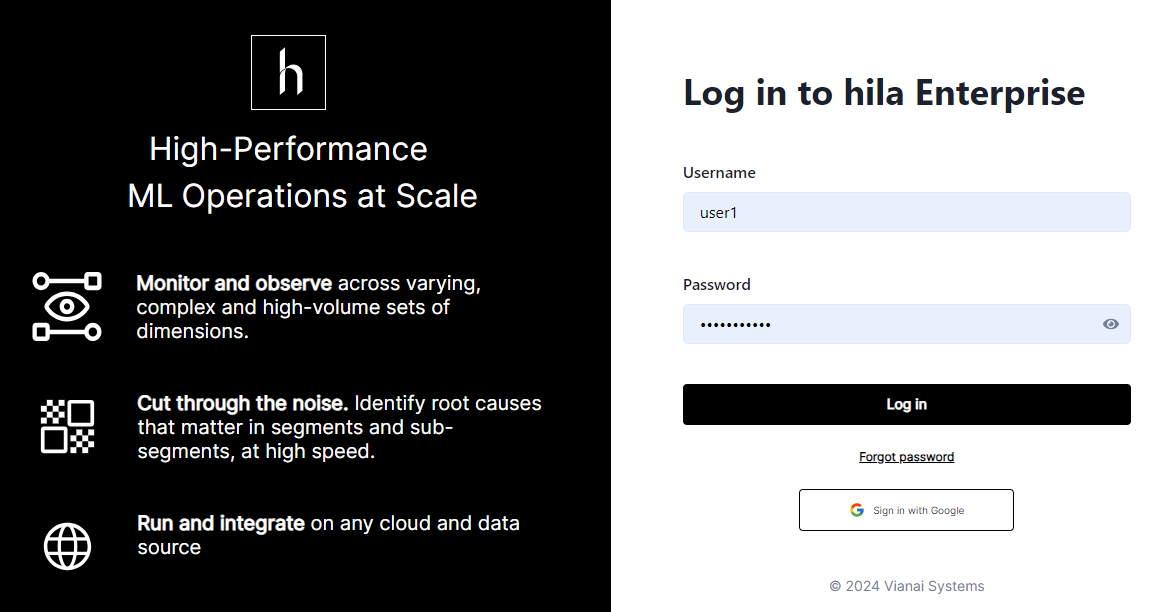
The following web page appears for you to log in to hila.
-
Clone images to your private registry
This section describes how to install and deploy Vianai container images into a private registry. The intended audience is customers with air-gapped, private cloud, or on-premise deployments.
To perform these following steps your computer needs to be configured with python, the Docker engine, and Google SDK.
Requirements
Vianai provides:
-
Service account—A file containing credentials with read-only access for the Vianai container images in GCR (Google Cloud Registry).
-
Image map—A JSON-formatted file with a list of Vianai images.
-
Clone script—Python script to pull Vianai container images and transfer them to the target registry.
You provide:
-
Google SDK—Google Cloud binaries allowing authentication to Google Cloud services. See list of required software and versions.
-
Storage—Recommend 1TB of temporary storage for Docker container to be stored until the process completes.
Steps
Use the following steps to clone the Vianai container repository.
-
Extract the list of containers:
python generate-image-map.py --version <VERSION> --output-file vianai-<VERSION>.jsonwhere
VERSIONshould match the Vianai platform For example, for v3.1r1 the command may be:python generate-image-map.py --version 3.1r1 --output-file vianai-v3.1r1.jsonNote that you may not want or need all images provided in the image. Work with your Vianai Sales or Support representative if you want to remove unneeded images.
-
Make sure the private registry is set up and Docker is authenticated. See the section “Registry Authentication” (below) for instructions to create the private registry and set up authentication specific to the target cloud provider.
-
Create a docker secret so you can pull the image to your private registry.
-
Create a file called
secret.yamlwith the following content, and replace the placeholderSECRETwith your secret:apiVersion: v1 data: .dockerconfigjson: SECRET metadata: name: secret-registry kind: Secret -
Add the secret to the default namespace with:
kubectl apply -f secret.yaml -n default -
Add the secret to the knative namespace with:
kubectl apply -f secret.yaml -n knative-serving -
When you run a job to pull the image, you must add the secret metadata name defined in the secret file as a value to the image_pull_secrets keyword as follows:
[
   {
      "name": "string",
      "description": "string",
      "status": "active",
      "image_url": "string",
      "default_params": {
         "nodepool_label": "",
         "memory": 0.5,
         "memory_scale": "Gi",
         "cpu": 250,
         "cpu_scale": "m",
         "gpu": 0,
         "autoscaling_class": "kpa.autoscaling.knative.dev",
         "autoscaling_metric": "concurrency",
         "autoscaling_target": 200,
         "min_scale": 0,
         "max_scale": 1
         "image_pull_secrets": [
            "secret-registry"
         ]
      },
      "volume_mounts": {},
      "environment_variables": {},
      "port": 8080,
      "runtime_object": "knative"
   }
]
-
-
Tag and push the containers to the new private registry:
python import-images.py --map-file vianai-<VERSION>.json --dest-repo <DEST-REPO>where:
VERSIONshould match the Vianai platformDEST_REPOmust match the address for the target private registry
For example, for v3.1r1 the command for a test repo may be:
python import-images.py --map-file vianai-3.1r1.json --dest-repo testprivaterepo.azurecr.ioWhile the command for a production AWS repo may be:
python import-images.py --map-file vianai-3.1r1.json --dest-repo <AWS ACCT ID>.dkr.ecr.<REGION>.amazonaws.com -
Authorize access to the Vianai container repository:
gcloud auth activate-service-account <ACCOUNT-NAME> --key-file=<YOUR-SERVICE-ACCOUNT-CREDS>.json

gcloud auth configure-docker us.gcr.io
where:
ACCOUNT-NAMEis the value provided in the client_email field of your service account fileYOUR-SERVICE-ACCOUNT-CREDSis provided in your service account file
-
Set up WRITE access authorization for the private container registry.
-
Transfer Vianai images using the clone script:
python import-images.py --map-file <VIANAI-PROVIDED-IMAGE-MAP-FILE> --dest-repo <PARTNER-CONTAINER-REGISTRY>where:
VIANAI-PROVIDED-IMAGE-MAP-FILEis the location of the Vianai-provided image map filePARTNER-CONTAINER-REGISTRYis provided in your service account file
Repository Authentication
Azure
- See instructions for creating a container registry in Azure.
- Authenticate via command line:
  az login --use-device-code
  az acr login -n TESTPRIVATEREPO --expose-token
where
TESTPRIVATEREPOis the name for your Azure container registry (replace with actual registry name)
AWS
- See instructions for creating a container registry in create ECS.
-
Authenticate via command line:
  export AWS_ACCESS_KEY_ID=xxxxxx
  export AWS_SECRET_ACCESS_KEY=yyyyy

  aws ecr get-login-password --region REGION | docker login --username AWS --password-stdin AWS_ACCT_ID.dkr.ecr.REGION.amazonaws.com
where:
REGIONmatches your ECS regionAWS_ACCT_IDidentifies your AWS account
GCP
- See instructions for creating a container registry in create GCP.
-
Authenticate via command line:
  gcloud auth activate-service-account <ACCOUNT-NAME> --key-file=<YOUR-SERVICE-ACCOUNT-CREDS>.JSON
  gcloud auth configure-docker us.gcr.io
where:
ACCOUNT-NAMEmatches your GCP registry account name regionYOUR-SERVICE-ACCOUNT-CREDSidentifies your GCP service account
Standard hila install
Standard install pulls hila containers from hila’s cloud package registry and includes everything you need to install an instance of hila, including an SSH certificate, DNS registration. If you want to install with your own certificate, click the Custom Cert button. If you want to install with a custom certificate and install hila from a local registry, click Custom Cert & Repo.
Install hila with a custom certificate
You can install hila with your own custom certificate. As with standard install, this pulls hila packages from hila’s cloud package registry but it applies your custom certificate to the process. If you want to install with a custom certificate and install hila from a local registry, click Custom Cert & Repo.
Install hila with a custom certificate and repo
You can install hila with you own custom certificate and download hila’s packages to install them from a local machine.
Install hila in an on-prem, air-gapped environment
If you need to install hila in an air-gapped environment, you can install hila with your own custom certificate and download hila’s packages to install them from a local registry.
Whitelist URLs
In an air-gapped environment, the following URLs need to be whitelisted for hila to function.
For install
- us-central1-docker.pkg.dev
- launchpad.vianai.site
For configuraiton
- goldensql-service.wonderfulcliff-ce61ff72.eastus.azurecontainerapps.io
For OpanAI or Azure Open AI LLMs
If you will be using OpenAI or Azure OpenAI LLMs in your air-gapped environment, you must whitelist the following URLs:
- OpenAI
- https://api.openai.com/v1/chat/completions
- Azure OpenAI
- https://hila-gpt.openai.azure.com
- https://hila-benchmarking.openai.azure.com
Create ssh keys to access the VM
-
In a terminal on your local machine, run
ssh-keygento create a new key pair. -
Press enter to accept the default location for the key pair, or enter a filename.
-
Press enter to accept the default passphrase, or enter a passphrase.
-
Press enter to confirm the passphrase.
-
The public key is saved in the
~/.sshdirectory with the default name or the name you provided. -
Open the public key file and copy the contents to the ssh public key field when you create the VM.
Create a VM
Create a VM with the follow minimum requirements:
CPUs 16 RAM 64 GB Disk 500 MB OS Ubuntu 22.04 LTS Networking • HTTPS (for end user access)
• SSH enabled (or similar method so you can upload the script to the VM)
- Note the IP address for use in the installation process.
- For convenience and consistency, create the VM with the username
ubuntu. If you use a different username, replaceubuntuwith your username in the following steps.
Install hila
-
From a terminal on your local machine,
sshinto the VM, making sure to editYOUR_PRIVATE_KEY_FILEto your private key file andIP_ADDRESSto your VM’s IP address:ssh -i "~/.ssh/<YOUR_PRIVATE_KEY_FILE>.key" -o StrictHostKeyChecking=no ubuntu@<IP_ADDRESS> -t bash -
Run the following
exportcommands to set up the variables for the install, updating the values with UPPERCASE letters to match your environment.export api_key=YOUR_API_KEY export version=HILA_BUILD_TO_INSTALL (ex: 3.2.0-r.2) export domain=YOUR_DNS_DOMAIN export datadir=/home/ubuntu/data export cloud_provider=CLOUD_PROVIDER [ aws|azure|gcp|oci ] export admin_email=YOUR_EMAIL- Important: The email is important because it is used to send a one-time login email to the admin user. The admin then sets up a password as then has access to hila.
-
Pull the latest install scripts from launchpad with the following command:
wget --header "x-api-key:$api_key" -q -O - 'https://webservices.launchpad.vianai.site/v1/stacks-installers' | tar -xzv -
Install
webfsd, which functions as a server for your VM.sudo apt update && sudo apt install webfsNote: If you don’t install this server, you will get an error later when you verify the web server.
-
Run the pre-check script to gather the VM details necessary to verify it is suitable to install hila.
sudo ./cluster-creation-scripts/k3s_vm_precheck.sh api_key=$api_key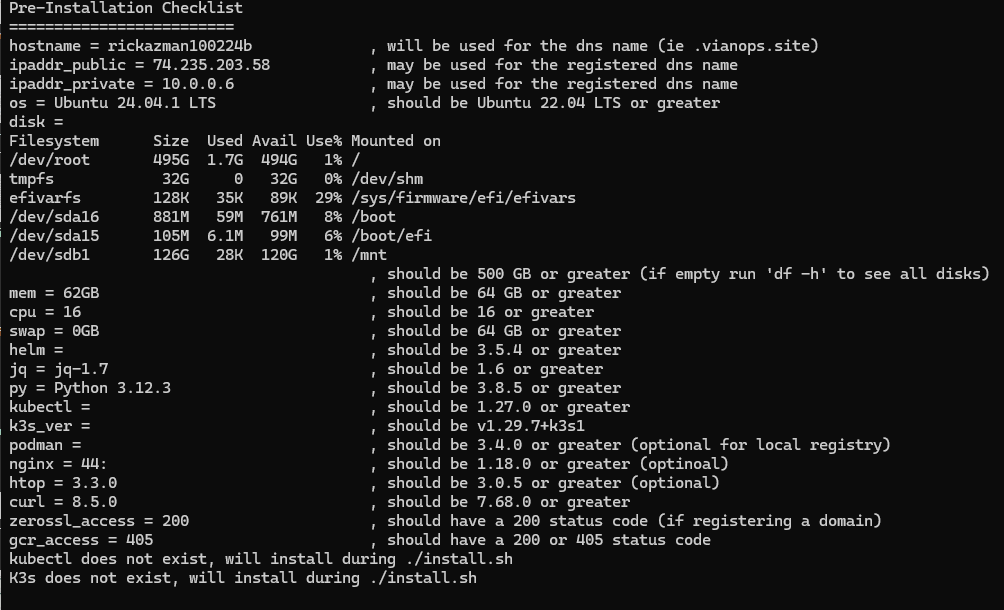
-
The recommended values are in the column on the right.
-
If you don’t run with
sudo, you will get apermissions deniederror.
-
-
The pre-check script starts the
webfsdserver, so it holds the prompt. To test the web server, open a new terminal window, ssh into the VM, and run the following command:curl --insecure https://localhost:443- If you did not install
webfsd, you will see an error instead of this output. -
If the web server is working, you will get output similar to the following:
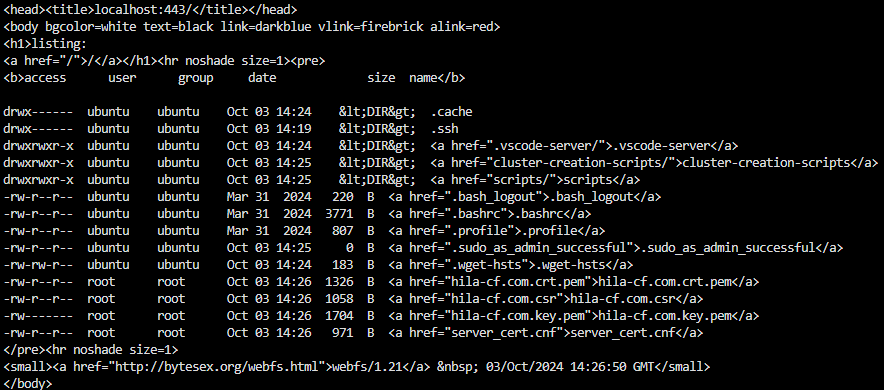
- If you did not install
-
In the terminal with the webfsd server running, press
Ctrl+Cto stop thewebfsdserver. -
Run the install command.
./cluster-creation-scripts/k3s-microstack.sh vm_setup_only=run cloud_provider=$cloud_provider custom_cert=no custom_repo=no cluster_name=$HOSTNAME admin_email=$admin_email datadir=$datadir dns_domain=$domain api_key=$api_key image_branch=$version-
If you are prompted for values, press
Enterto accept defaults. -
After this command finishes, it can take up to 30 minutes for you to get the one-time login email.
-
To monitor the progress of the pod install, open a new terminal window to the VM and enter the following command:
watch -n 2 kubectl get pods -
You can also monitor when the certificate goes true in another terminal window with this command:
watch -n 2 kubectl get certificates -A
-
-
When the install is complete, you will receive an email with a one-time login link.
-
Click the link in the email to set up your password and log in to hila.
Configure LLMs
You must configure LLMs with your own API tokens. For more information, see LLM configuration.
Install hila
- Create your certificate and register the A and CNAME DNS records, making sure the records point to the VMs IP address. To verify, ping the VM:
ping <VM_IP_ADDRESS>to verify the A record.ping monitoring.<VM_IP_ADDRESS>to verify the CNAME record.
-
Copy your new certificate and key files to VM in /home/ubuntu:
scp -i ~/.ssh/<YOUR_PRIVATE_KEY_FILE>.key <CERTIFICATE_FILE> ubuntu@<VM_IP_ADDRESS>:/home/ubuntu/ -
From a terminal on your local machine,
sshinto the VM, making sure to editYOUR_PRIVATE_KEY_FILEto your private key file andIP_ADDRESSto your VM’s IP address:ssh -i "~/.ssh/<YOUR_PRIVATE_KEY_FILE>.key" -o StrictHostKeyChecking=no ubuntu@<IP_ADDRESS> -t bash -
Run the following
exportcommands to set up the variables for the install, updating the values with UPPERCASE letters to match your environment.export api_key=YOUR_API_KEY export version=HILA_BUILD_TO_INSTALL (ex: 3.2.0-r.2) export domain=YOUR_DNS_DOMAIN export datadir=/home/ubuntu/data export cert_file_path=CERTIFICATE_FILE export key_file_path=KEY_FILE export cloud_provider=CLOUD_PROVIDER [ aws|azure|gcp|oci ] export admin_email=YOUR_EMAIL -
Pull the latest install script from launchpad with the following command:
wget --header "x-api-key:$api_key" -q -O - 'https://webservices.launchpad.vianai.site/v1/stacks-installers' | tar -xzv -
Install
webfsd, which functions as a server for your VM.sudo apt update && sudo apt install webfsNote: If you don’t install this server, you will get an error later when you verify the web server.
-
Run the pre-check script to gather the VM details necessary to verify it is suitable to install hila.
sudo ./cluster-creation-scripts/k3s_vm_precheck.sh api_key=$api_key domain=$domain cert_file=$cert_file_path key_file=$key_file_path-
The recommended values are in the column on the right.
-
If you don’t run with
sudo, you will get apermissions deniederror.
-
-
The pre-check script starts the
webfsdserver, so it holds the prompt. To test the web server, open a new terminal window, ssh into the VM, and run the following command:curl --insecure https://localhost:443- If you did not install
webfsd, you will see an error instead of this output. -
If the web server is working, you will get output similar to the following:
- If you did not install
-
Run the install command.
./cluster-creation-scripts/k3s-microstack.sh vm_setup_only=run cloud_provider=$cloud_provider custom_cert=yes cert_file=$cert_file_path cert_key_file=$key_file_path custom_repo=no cluster_name=$HOSTNAME admin_email=$admin_email datadir=$datadir dns_domain=$domain api_key=$api_key image_branch=$version-
If you are prompted for values, press
Enterto accept defaults. -
After this command finishes, it can take up to 30 minutes for you to get the one-time login email.
-
To monitor the progress of the pod install, open a new terminal window to the VM and enter the following command:
watch -n 2 kubectl get pods -
You can also monitor when the certificate goes true in another terminal window with this command:
watch -n 2 kubectl get certificates -A
-
-
When the install is complete, you will receive an email with a one-time login link.
- Click the link in the email to set up your password and log in to hila.
Configure LLMs
You must configure LLMs with your own API tokens. For more information, see LLM configuration.
Install hila
- Create your certificate and register the A and CNAME DNS records, making sure the records point to the VMs IP address. To verify, ping the VM:
ping <VM_IP_ADDRESS>to verify the A record.ping monitoring.<VM_IP_ADDRESS>to verify the CNAME record.
-
Copy your new certificate and key files to VM in /home/ubuntu:
scp -i ~/.ssh/<YOUR_PRIVATE_KEY_FILE>.key <CERTIFICATE_FILE> ubuntu@<VM_IP_ADDRESS>:/home/ubuntu/ -
From a terminal on your local machine,
sshinto the VM, making sure to editYOUR_PRIVATE_KEY_FILEto your private key file andIP_ADDRESSto your VM’s IP address:ssh -i "~/.ssh/<YOUR_PRIVATE_KEY_FILE>.key" -o StrictHostKeyChecking=no ubuntu@<IP_ADDRESS> -t bash -
Run the following
exportcommands to set up the variables for the install, updating the values with UPPERCASE letters to match your environment.export api_key=YOUR_API_KEY export version=HILA_BUILD_TO_INSTALL (ex: 3.2.0-r.2) export domain=YOUR_DNS_DOMAIN export datadir=/home/ubuntu/data export azure_repo=customerrepo.azurecr.io export cert_file_path=CERTIFICATE_FILE export key_file_path=KEY_FILE export cloud_provider=CLOUD_PROVIDER [ aws|azure|gcp|oci ] export admin_email=YOUR_EMAIL -
Pull the latest install script from launchpad with the following command:
wget --header "x-api-key:$api_key" -q -O - 'https://webservices.launchpad.vianai.site/v1/stacks-installers' | tar -xzv -
Install
webfsd, which functions as a server for your VM.sudo apt update && sudo apt install webfsNote: If you don’t install this server, you will get an error later when you verify the web server.
-
Run the pre-check script to gather the VM details necessary to verify it is suitable to install hila.
sudo ./cluster-creation-scripts/k3s_vm_precheck.sh api_key=$api_key domain=$domain cert_file=$cert_file_path key_file=$key_file_path-
The recommended values are in the column on the right.
-
If you don’t run with
sudo, you will get apermissions deniederror.
-
-
The pre-check script starts the
webfsdserver, so it holds the prompt. To test the web server, open a new terminal window, ssh into the VM, and run the following command:curl --insecure https://localhost:443- If you did not install
webfsd, you will see an error instead of this output. -
If the web server is working, you will get output similar to the following:
- If you did not install
-
Download and install the Azure CLI as described in Install other tools.
-
Download and install gcloud as described in Install other tools.
-
Install Docker as described in Install other tools.
- Get the transfer scripts by running each of the following commands:
wget --header "x-api-key:$api_key" -q -O - "https://webservices.launchpad.vianai.site/v1/generate-transfer?image_branch=$version&cloud_provider=azure&dest_repo=$azure_repo" | tar -xzv./transfer.sh
-
Run the install command.
./cluster-creation-scripts/k3s-microstack.sh vm_setup_only=run cloud_provider=$cloud_provider custom_cert=yes cert_file=$cert_file_path cert_key_file=$key_file_path custom_repo=no cluster_name=$HOSTNAME admin_email=$admin_email datadir=$datadir dns_domain=$domain api_key=$api_key image_branch=$version-
If you are prompted for values, press
Enterto accept defaults. -
After this command finishes, it can take up to 30 minutes for you to get the one-time login email.
-
To monitor the progress of the pod install, open a new terminal window to the VM and enter the following command:
watch -n 2 kubectl get pods -
You can also monitor when the certificate goes true in another terminal window with this command:
watch -n 2 kubectl get certificates -A
-
-
When the install is complete, you will receive an email with a one-time login link.
-
Click the link in the email to set up your password and log in to hila.
- Run Install (will ask a few questions press enter to skip since not creating VM) a. ./cluster-creation-scripts/k3s-microstack.sh vm_setup_only=run cloud_provider=azure custom_cert=yes cert_file=$cert_file_path cert_key_file=$key_file_path custom_repo=yes dest_repo=$azure_repo cluster_name=$HOSTNAME admin_email=admin_email datadir=$datadir dns_domain=$domain api_key=$api_key image_branch=$version
Configure LLMs
You must configure LLMs with your own API tokens. For more information, see LLM configuration.
Install hila
- Create your certificate and register the A and CNAME DNS records, making sure the records point to the VMs IP address. To verify, ping the VM:
ping <VM_IP_ADDRESS>to verify the A record.ping monitoring.<VM_IP_ADDRESS>to verify the CNAME record.
-
Copy your new certificate and key files to VM in /home/ubuntu:
scp -i ~/.ssh/<YOUR_PRIVATE_KEY_FILE>.key <CERTIFICATE_FILE> ubuntu@<VM_IP_ADDRESS>:/home/ubuntu/ -
From a terminal on your local machine,
sshinto the VM, making sure to editYOUR_PRIVATE_KEY_FILEto your private key file andIP_ADDRESSto your VM’s IP address:ssh -i "~/.ssh/<YOUR_PRIVATE_KEY_FILE>.key" -o StrictHostKeyChecking=no ubuntu@<IP_ADDRESS> -t bash -
Run the following
exportcommands to set up the variables for the install, updating the values with UPPERCASE letters to match your environment.export api_key=YOUR_API_KEY export version=HILA_BUILD_TO_INSTALL (ex: 3.2.0-r.2) export domain=YOUR_DNS_DOMAIN export datadir=/home/ubuntu/data export cust_repo=localhost:5000 export cert_file_path=CERTIFICATE_FILE export key_file_path=KEY_FILE export cloud_provider=CLOUD_PROVIDER [ aws|azure|gcp|oci ] export admin_email=YOUR_EMAIL -
Pull the latest install script from launchpad with the following command:
wget --header "x-api-key:$api_key" -q -O - 'https://webservices.launchpad.vianai.site/v1/stacks-installers' | tar -xzv -
Install
webfsd, which functions as a server for your VM.sudo apt update && sudo apt install webfsNote: If you don’t install this server, you will get an error later when you verify the web server.
-
Run the pre-check script to gather the VM details necessary to verify it is suitable to install hila.
sudo ./cluster-creation-scripts/k3s_vm_precheck.sh api_key=$api_key domain=$domain cert_file=$cert_file_path key_file=$key_file_path-
The recommended values are in the column on the right.
-
If you don’t run with
sudo, you will get apermissions deniederror.
-
-
The pre-check script starts the
webfsdserver, so it holds the prompt. To test the web server, open a new terminal window, ssh into the VM, and run the following command:curl --insecure https://localhost:443- If you did not install
webfsd, you will see an error instead of this output. -
If the web server is working, you will get output similar to the following:
- If you did not install
-
Download and install gcloud as described in Install other tools.
-
Install Docker as described in Install other tools.
- Get the transfer scripts by running each of the following commands:
wget --header "x-api-key:$api_key" -q -O - "https://webservices.launchpad.vianai.site/v1/generate-transfer?image_branch=$version&cloud_provider=azure&dest_repo=$azure_repo" | tar -xzv./cluster-creation-scripts/local-registry.sh install_podman=yes datadir=$datadir./transfer.sh
-
Run the install command.
./cluster-creation-scripts/k3s-microstack.sh vm_setup_only=run cloud_provider=$cloud_provider custom_cert=yes cert_file=$cert_file_path cert_key_file=$key_file_path custom_repo=yes dest_repo=$cust_repo cluster_name=$HOSTNAME admin_email=$admin_email dns_domain=$domain api_key=$api_key image_branch=$version-
If you are prompted for values, press
Enterto accept defaults. -
After this command finishes, it can take up to 30 minutes for you to get the one-time login email.
-
To monitor the progress of the pod install, open a new terminal window to the VM and enter the following command:
watch -n 2 kubectl get pods -
You can also monitor when the certificate goes true in another terminal window with this command:
watch -n 2 kubectl get certificates -A
-
-
When the install is complete, you will receive an email with a one-time login link.
- Click the link in the email to set up your password and log in to hila.
Configure LLMs
You must configure LLMs with your own API tokens. For more information, see LLM configuration.
Install other tools
You only need to install these one time for your VM.
- Download and install the Azure CLI.
curl -sL https://aka.ms/InstallAzureCLIDeb | sudo bash az login --use-device-code az acr login --name customerrepo - Download and install the Google Cloud CLI
curl https://packages.cloud.google.com/apt/doc/apt-key.gpg | sudo gpg --dearmor \ -o /usr/share/keyrings/cloud.google.gpg echo "deb [signed-by=/usr/share/keyrings/cloud.google.gpg] \ https://packages.cloud.google.com/apt cloud-sdk main" | sudo tee \ -a /etc/apt/sources.list.d/google-cloud-sdk.list sudo apt-get update && sudo apt-get -y install google-cloud-cli gcloud auth login - Install Docker
sudo apt-get update
sudo apt-get install ca-certificates curl
sudo install -m 0755 -d /etc/apt/keyrings
sudo curl -fsSL https://download.docker.com/linux/ubuntu/gpg -o /etc/apt/keyrings/docker.asc
sudo chmod a+r /etc/apt/keyrings/docker.asc
echo \
    "deb [arch=$(dpkg --print-architecture) signed-by=/etc/apt/keyrings/docker.asc] \
    https://download.docker.com/linux/ubuntu \
    $(. /etc/os-release && echo "$VERSION_CODENAME") stable" | \
    sudo tee /etc/apt/sources.list.d/docker.list > /dev/null
sudo apt-get update
sudo apt-get install docker-ce docker-ce-cli containerd.io docker-buildx-plugin docker-compose-plugin
sudo usermod -aG docker ${USER}
groups ### make sure the user has this in docker group. If not, try rebooting the VM.
Upgrade to a new hila release
You can upgrade to a new hila release by following these steps. They are the same for all install methods.
-
SSH into the VM where hila is installed.
-
Create a directory to store the existing files. For example,
sudo mkdir /usr/local/old_release -
In the
/home/ubuntudirectory, move all the files to the directory you created in the previous step. For example,sudo mv * /usr/local/old_release -
Re-run the install process as described above as you originally installed hila, but update the version number to the new release.