Manage metadata
hila metadata is the object that defines the elements required to run the hila system. These elements include database connections, LLM and embedding models, and database table schemas, among others.
The metadata appears in the hila UI as a datasource.
You can edit metadata, clone existing metadata, or create new metadata.
Accessing the metadata
-
Log in to the hila monitoring app using your hila credentials.
-
In the left navigation pane:
- Choose All Projects from the Select Projects Type dropdown list.
- Choose LLM Project from the projects list.
- Choose the metadata you want to manage from the Select Metadata dropdown list.
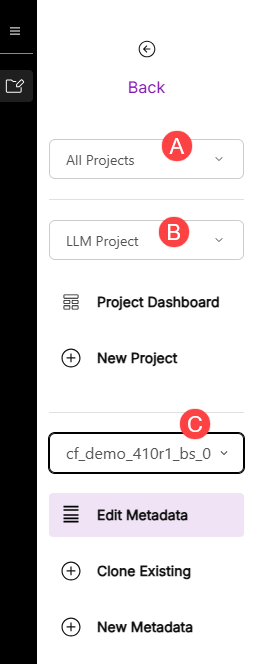
-
Click Edit Metadata to edit the existing data source, click Clone Existing to make a copy of the existing metadata, or click New Metadata to create new metadata from scratch.
Edit metadata
Verify and Export are top-level controls for the Edit Metadata page, while Import is grayed out.
- Verify — opens the Metadata Verification dialog box from which you can choose a question to ask hila to verify that the metadata is a valid data source.
- Import — (not available for edit) opens a file browser to select a JSON file with the metadata to import. Only available when creating a new metadata.
- Export — opens a file browser to select a location to save the metadata as a JSON file.
The tab controls are Overview, Add Table, and then a tab for each table defined in the metadata. The Overview tab is the default tab when you open the Edit Metadata page.
- Overview — shows all the metadata parameters except the table schemas.
- Version — shows the version of hila Conversational Analytics schemas associated with this metadata. This information is not editable.
- Files — shows the files associated with this metadata. Click the link to edit the configuration files related to this metadata. Click Clone files to create a copy of the files for editing. See Edit configuration files for more information.
- Database Connections — the database connection name. Not available for editing a metadata or a clone. Only available when creating a new metadata.
- Name — the name of the metadata. This text appears in the hila UI as the name of the datasource.
- Description — a description of the metadata. This text appears in the hila UI when hovering over the name of the datasource.
- LLM Models — shows the LLM models defined in the metadata. You can add models by choosing from the Add Model dropdown list and remove models by clicking Remove.
- Embedding Models — shows the embedding models defined in the metadata. You can add models by choosing from the Add Model dropdown list and remove models by clicking Remove. The Preferred checkbox controls which embedding model hila uses by default when there are multiple embedding models defined in the metadata.
- Preferred LLM Model — expand the list to set a preferred LLM model for each feature that uses a model.
- Entity Type — shows whether the database contains single or multiple entities. This information is implied from the table schemas. It is not editable.
- Default Currency — the default currency for the metadata.
- Views JSON — opens the Views JSON dialog box where you can create different views for your data.
- Company — the company associated with the metadata.
- Configuration —
- Add Table — Creates a new table tab.
- Table tab — shows the table schema for the table. The table tab is named after the table name. The table tab contains the following controls:
- Table Name — the name of the table in the database.
- Upload File — opens a file browser to select a CSV or PARQUET file of that table type to upload to the table.
- Overwrite Method — the method to use to overwrite the table data. The options are:
- replace — replace the existing data in the table with the new data.
- append — append the new data to the existing data in the table.
- upsert — update the existing data in the table with the new data, and insert any new data that does not already exist in the table.
- Engine — the database engine to use for the table. Fill in the columns indicated by
<specify_columns_selected_separated_by_commas>to connect to the database. - Add Transformers — select a transformer to the pipeline to apply to the table. You can edit the configuration of any transformer in the pipeline by clicking the edit button next to that transformer.
- Columns — shows the columns in the table and provides controls for you to change the name, type, set as primary, remove, give a default value, give an initial value, give any aliases, set foreign keys, add and remove columns, and download the schema for local storage.
- Preview Table Data — shows a preview of data in the table.
- Code Generation — shows the code in Python or JavaScript that you need to run if you want to load the table for that database manually.
- Remove Table — removes the table from the metadata.
- Save Schema — saves the schema for the table. This button is grayed out until you make a change to the schema.
- Save data into table — saves the data in the table. This button is grayed out until you make a change to the data.
Edit configuration files
When you click the link in the Files section of the Overview tab, the Edit Configuration Files page opens.
- Select the tab related to the config file you want to edit.
- Make the changes you want to the config file.
- Click Close.
- Make any other changes to the metaddata you want to make.
- At the bottom of the page, click either Save & Refresh to save the changes and refresh the metadata.
Clone existing metadata
When you select Clone Existing, the Clone Metadata page opens.
- In the Project dropdown list, set the project you want the new metadata to be associated with.
- Give a name to the new metadata. This name appears in the hila UI as the name of the datasource.
- Click Submit Clone to create the new metadata. After the clone is created, the Edit Metadata page opens with the new metadata appears in the hila UI under Datasources.
New Metadata
The items for new metadata are a subset of the editing metadata. However, the Connection field is available for editing. The Import button is available to import a JSON file with the metadata to import.
To create a new connection:
-
Click + Create new database and enter a database name in the Create New Database dialog box.
-
Click + Add Connection to open the Add New Data Source Connection window.
- Enter a unique name for the connection.
- Enter a description for the connection.
- Enter the connection URL.
- Choose the type of connection from the dropdown list.
- Click Test Connection to test the connection.
- Click Save.
Archive or delete metadata
By default, when you delete metadata, it is archived. Its status is set to inactive. In the future you can restart the metadata by changing its status back to active.
To delete the metadata, use the following vianctl command:
vianctl metadata delete --names <metadata_name>
This command archives the metadata. You can also delete the metadata, rather than archive, by using the --delete-type flag:
vianctl metadata delete --names <metadata_name> --delete-type delete
Set user permissions on data in your database
You can set up hila to respect the permissions you have set on your database views. This way, users see only the data they have permission to see.
You can set permissions based on individual users, or groups of users that hila calls roles. A role can be anything that groups users, from functional groups like “analysts” to groups based on the level of access like “read-only” or “admin”, or groups based on department or business unit.
The general flow is:
-
In your database, create a set of views with permissions defined for users and roles from the database perspective. For example, you might set a view to allow one group of users to see a set of rows in your database and another group of users to see different rows.
The steps for doing this depends on the database you are using. See the documentation for your database.
-
In the hila monitoring app, create users and roles that match the users and roles in your database views.
See Users, Roles, & Permissions for more information.